Monday, January 21, 2013
Hello Dolls,
I am back! The thing about change is that it can be time consuming but I intend to neglect you no longer.
I decided to clean my brushes today and i realized around brush 100 that some of you may not be washing and conditioning your brushes as often as you should or ever. It is essential to both condition your facial brushes for a few reasons including quality of application, hygiene, and basic skin health. Makeup, oils and dead skin on brushes can be the culprit in acne and skin irritations.
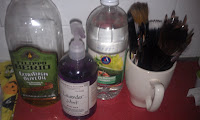
One of the least expensive ways to wash your brushes is a simple process with olive oil, gentle soap or shampoo and white vinegar.
1-put some olive oil on a rag or tower, wipe your brush bristles in oil then wipe off brush on clean area of towel
2-wash and rub the bristles in the water and gentle soap mixture
3-dip your brush into the vinegar
4- dry brush gently and lay out on a towel to let completely dry before use
Easy enough, the brushes end up conditioned,without buildup, clean and clean
 smelling and without any chemicals that can irritate skin.
Wednesday, March 23, 2011
Metallic Eyes
Metallic colors often come in loose pigment form and reflect light, to create depth, use metallic shades and then matte shades to contour.
Many times the application of metallic loose pigments can be tricky because they cause lots of dropdown, shadow that has fallen during application and lands on other parts of the face. This dropdown tends to smear when wiped away.
The secret to success with loose metallic pigments is
1.Put some of the powder from its container onto a flat surface and press your eyeshadow brush into the pigment, not wipe it but press it.
2.Then, shake off some excess.
3.When applying it on lids, always prep lids with a shadow base and press to apply, not swipe only the lids.
4. Once some pigment is on the lids you can blend with a clean , dry brush.
Metallic loose pigments will take some playing with as well as getting used to, don’t be afraid of them. Remember, it will wash off if you do not like the results.
Monday, February 21, 2011
Controlling Eyeshadow Dropdown
Controlling Eyeshadow Dropdown
Eyeshadow is a fantastic part of a makeup routine. It does not come without its annoyances. One of these shadow setbacks is dropdown. It is simply when the shadow drops from application and lands on other parts of your face, usually under your eyes making you look like you have been socked in the face depending on the shadow color.
There are three different ways to deal with dropdown.
1.Babywipes or oilfree makeup remover pads. Just do your eyes and use them to clean up the drop down. This works well for lighter shadows but loose pigments or darker colors will smear and take a tad more cleaning and wiping.
2. Wait to do your foundation and powder after your eyes are done, first use puffy brush to swipe away excess dropdown and apply foundation.
3. Before applying eyeshadow use a highlighting foundation and coat under your eyes and on your cheekbones, apply the shadow and then wipe away and blend the left over foundation.
Any of these methods to get rid of dropdown will work fine and fix a common but simple righted makeup problem.
Monday, February 7, 2011
I will do anything to lose weight, except what I have to do to lose weight!


I know that you Dollfaces come here to read about beauty and catch some tips on makeup. I also know that you have been more than supportive in the other advancements that I have been attempting in my life. I feel obligated to invite you into another, more personal part of myself, like it or not.
I have always been a person who struggles with her weight. Since childhood I have been in this battle, not only for myself but my family and sometimes what feels like scores of other ladies who are in the same fight. I am not blind to the connection to my weight issues and my extreme drive to make women feel their best through makeup and cosmetology. I believe that feeling good is the desired end result of all that we should strive to do. Having other people tell us we look good is not enough to make the cut either; we need to feel it for ourselves.
Recently, I became open to the idea that I wanted to be strong, not thin and it had changed my entire self view. I have always been interested and involved in fitness, I am built kinda like a brick house, “old stock and good for farm work” as my grandfather would say, just what a young lady wants to hear. I hated my strength and wanted dainty, flowing features, but just was very Ogre like instead. My way to battle my genetics was a hearty eating disorder. Eating about 300 calories a day and you guessed it, still staying fat! At one point I was pushing 240 at 16 years old. From then it was the up and down weight seesaw through my twenties.
As I got older I tried so many things that my coworkers would joke about what the eating plan of the week was. I was depleted and tired. I was tired of the fight but did not give up. I was working out with a trainer friend who tapped into the athletic competition that always festered within. He never once judged me unless it was to tell me that I was not eating enough and to cut the crap or he would not work out with me anymore. When he suggested I take Body By Vi shakes it was to supplement the lack in protein I was experiencing as a vegetarian. Within the first week, I had elevated energy and could work out more intensely while working and going to night school, making for 15 hour days. I no longer worried about food obsessively and started to save money by taking shakes to class. I never felt deprived or like a social pariah because you can still eat healthy snacks and a hearty meal so eating out or with friends is no sweat.
I did not tell anyone what I was doing at first because I frankly did not want to hear their shit about it. Within two weeks, people began to comment about how much slimmer I was getting and how much more toned my legs were. I was in awe because my workouts had not changed so it must have been the Body By Vi Challenge. I am beginning month two and am now down from a dress size 16 to a small 12 right now. I am not done yet, I am just inviting you and others to join me. The biggest change thus far cannot be seen, this is why I feel the need to write this because it is in how I feel, not look. I feel as if yes, I can be on this program forever, it is as natural as my taking vitamins daily or an after gym protein shake to revive and replenish my body. The shakes taste good, it is easy and everyone deserves to give themselves this chance, three months to change it all!
I feel good about the fact that I finally would do anything to lose weight, so much that I did exactly what it takes to lose weight and embrace that strong is hot, healthy is hot, feeling good about how you feel and look is hot.
If you want to make a fitness change too check out my site or email me, samples await.
Bodybyvidoll.bodybyvi.com
Thursday, January 27, 2011
Salon Effects by Sally Hansen Review
Sally Hansen Salon Effects Real Nail Polish Strips
I hate getting my nails done. I love the result but even when I find the time I hate the process. When I do manage to get myself into the chair, I will leave before I am completely dry and smudge it before leaving the salon and be too lazy to get them retouched.
I will try anything to avoid the manicure lady who is without a doubt talking about me attempting to scratch my back on the chair to avoid the smudging that will occur when I try to open the apartment door anyway.
I saw an ad for Sally Hansen’s Salon Effects Real Nail Polish Strips and I jumped at the chance to try them. They promise to stay on for up to ten days and nobody can doubt the cool patterns and tempting idea of how easy they are.
To test their claim at simplicity and sticking power, I decided to put them on in my car while waiting for my Beauty School class. So, I popped open the box and went at them. The rules are simple to follow, peel, stick, press and file. I advise you cut and not file because filing tended to rip them. As time went on after application began to see that as I texted my life away as always, the tips of the nail strips started to peel. This annoyed me just as much as smudging wet polish would.
As the evening progressed I fielded about five comments from fellow beauty school students about how good my nails looked and questions about how I got the patterns to look like that. I then decided that maybe the eye catching quality of the strips may outweigh the annoyances that come with them.
When I returned home that evening I threw some clear polish over my nails in hopes that it would work as an adhesive. I am four days into the strips and there has been some more minimal peeling. All in all is it worth the ten bucks? Not as a regular option, no. In a pinch, maybe. I think that a $7.00 manicure with a two dollar tip and some hard core chip proof clear polish over it is a better bet. However if you want a cool pattern for a few days, go for it but do not think that yours will last the “up to ten days” that is mentioned on the packaging. Mine is a day away from peel town and I do minimal housework, although I do work a lot with my hands in cosmetology, this week I have not had my hands saturated in much water besides showering. If you are a person who cares more about the state of their apartment, these strips do not stand a chance against cleaning hands.
I like the idea Sally Hansen, I so want it to work, maybe next generation of Salon Effects will prove more success.


Saturday, January 8, 2011
Pin Up Cat Eye Makeup
Pin Up Cat Eye Makeup
I rock a cat eye every single day. No matter my plans or outfit, without a doubt I will always have a liquid eyeliner created cat eye. I wear it with a smokey eye, a metallic eye, nude eye, probably even if I got a black eye. It is just what I am most comfortable in and I believe it enhances the feature that I enjoy the most about my face, my eyes. In addition, since I also wear false eyelashes daily, it is a easy and fashionable way to disguise lash seams and glue blunders too. What first attracted me to the cat eyed look was my love for Burlesque and all things pinup culture.
The cat eyed liner look is a classic that took off in the 50’s and evolved to a thicker and more winged look in the 60’s. Feel free to use a gel pot liner if you are not a fan of liquid liners. For a classic pin up look, pair the cat eye with the Snow Day Eye Shadow and the Red Lip tutorials. Play and pair the cat eye with any of the eye shadow looks that I have featured or your own everyday look.
Materials
Gel eyepot in black any brand, MAC, L’Oreal have gel pots.
Angled eyeliner brush. The angled, stiff edged brushes will make application easier.
Liquid eyeliner-I like the Stella water proof eye pen but you can also use the liquid ones like Urban Decay that are liquid pots that include brushes also.
Steps
1. Apply the eye shadow look that you are paring with the cat eye.
2. Placing your clean fingertip on the outer corner of your eye, pull in taut in order to smoothly drag the liner from the innermost corner of the eye all along the lashline.
3. Go back over the line as many times as you need to establish the line thickness.
4. The size of the winged out portion of the eye-lining is up to you Try it short, extend it long, take some chances and see what you like.
I have found that eyeliner changes and pulls together any look. From Brides to showgirls, slick black eyeliner is a great finishing touch and brightens the eye, turning ho, hum makeup into a cohesive look.
Brow Beating
Pluck, pluck, wax, thread, pluck. Before you know it you are staring into your bathroom window wondering why there are two commas where your eyebrows used to be. I have fallen victim to the over plucking craze since teenhood and have not had much luck returning back to my bushier brows. The problem is that thicker, healthy looking brows make a face look thinner and younger. Damn, my old brows could have acted like a face girdle and I plucked them off? Blasted tweezers!
As always, cosmetic companies have come to my thin browed rescue as sweat runs into my eyes with no brows to catch it. So, fill’em in ladies.It makes a real difference to your look, it frames the face and when done correctly can look very natural and like you grew them yourself.
Materials
A brow powder that is close to your hair color. These brow powders often come with a few colors to mix for your desired shade and my favorite come with both a waxy product and powdery one. I recommend that if you have dark hair, go with a dark brown and only go with a black color if you have black hair or are looking for mega drama.(ELF has one for a buck)
A slanted brush with stiff bristles
If you are not sure that of what shape you would like to transform your brows to, beauty supply stores and some drug stores sell stencils of brow shapes but for most people, following your brows natural arch will be the best option.
Steps
The best advice that can be given about filling in one’s brows is to use short strokes.
Subscribe to:
Posts (Atom)